


Introduction
When you’re running an event, you don’t get a second chance at safety. As a business owner, event planner, or operations manager, you’re already juggling enough—from managing vendors to ensuring guests have a seamless experience. Among all such priorities, the last thing you’ll want to deal with is a wobbly tent. A tent that shakes, shifts, or risks collapsing won’t just add to the stress, but also not reflect well on your reputation.
One of the must-do things for you as a business owner before hosting a trade show or a business event is to inspect the event venue’s surface to plan properly. Inspecting the surfaces beforehand will give you a better idea of their requirements and help you prepare the essentials to anchor your tent safely. Furthermore, you can take it one step further and also implement event safety management strategies for an even smoother experience.
Whether you’re setting up a sturdy tent for a corporate retreat, a canopy tent for a trade fair, or a large multi-day event structure, this question is bound to hit you: How to secure your tent on different surfaces safely and securely? For that, understanding the ground conditions well can make all the difference. In this guide, we’ll learn exactly how to keep your tent secure—without stress—across different surface types and the various kinds of anchors and techniques you can utilize.
Know Your Ground Before You Set Up
The first and most crucial step in setting up your custom tent is the site inspection. Just like before building a house, you need to survey the land to lay a strong foundation for it. The same principle applies here as well. Before setting up a tent for your business event, you must properly inspect the surface or land to avoid safety mishaps, as they can damage your business reputation.
Many professionals tend to skip this step due to tight schedules and multiple priorities at hand. However, taking time to set up a tent can save you stress and inconvenience later if it shakes or collapses in harsh weather or during a crowd rush. Let’s learn how one must inspect the surfaces properly:
Start by identifying the ground:
- Soil Composition and Moisture: This is crucial to know, as it helps you understand how much weight you may need and which anchoring techniques you may need to use to set up a tent safely and securely. Check whether the grass is firm or waterlogged; this can indicate loose soil. Wet soil can drastically reduce the holding power of your tent stakes.
- Subsurface Obstacles: Before digging your stakes, always check for hazards such as utility lines, irrigation pipes, or concealed concrete slabs. Damaging these lines or pipes can pose a safety hazard to both you and visitors. You can always call 811 (or your local equivalent) for help before anchoring your tent.
- Slope and Drainage: A slight slope can cause water to pool under the tent, but a significant incline may require specialized attention to level the ground for stability.
Understanding the ground allows you to select the right anchor tools from the start, helping you save time, prevent damage, and host events safely.
Each ground type has its own requirements; thus, different or specialized methods for anchoring a tent are needed. Even if you have a durable canopy tent frame, it’ll hold up well only if it’s paired with the right anchoring strategy.
For example, imagine you’re hosting a new product launch event in a venue with a perfectly flat concrete base. Although the base looks smooth, your traditional stakes won’t work on this surface—if you attempt to force them in, you’ll end up either damaging the pavement or breaking your stakes.
Or you imagine a beachside event for a client celebration or a stall selling your products and services. Now here, the sand can shift easily, and using the wrong anchoring method can cause your vendor tent to wobble with every breeze. Thus, you’ll need to choose stakes and techniques that suit the sandy surface.
The key takeaway: your tent is only as safe as the ground beneath it.
Anchoring a Tent on Hard Surfaces
(Concrete, asphalt, and other solid bases)
Hard surfaces are the most challenging grounds to set up on, as they don’t allow for any penetration. This completely precludes the use of traditional stakes for holding up your tent. But they are also the most common surfaces for corporate events, exhibitions, trade shows, and parking lot installations.
Therefore, you must rely on dead weight or mechanical fastening. Here’s how to secure your tent on different hard surfaces:
1. Weighted Anchors
When you’re setting up a canopy tent, event tent, or any sturdy tent on a surface where traditional tent stakes can’t be driven into the ground—like concrete, asphalt, wooden decks, or indoors—weighted anchors become your best option. These weights help you as a counterbalance in wind, preventing your tent from lifting, shifting, or collapsing.
Here’s how each type works:
Water Barrels
- Ideal for short-term or temporary setups such as fairs or pop-up stalls.
- They can be filled on-site, making them easy to transport.
- Once filled, they offer excellent stability and can be directly attached to each tent leg using straps or anchor tools.
Concrete Blocks
- Perfect for longer-term or semi-permanent installations.
- They provide reliable, heavy-duty anchoring for larger canopy tent frames.
- They are typically placed next to each leg using straps or chains to the block.
Sandbags
- Great for smaller canopy tents or lightweight structures.
- They are positioned around the base of each leg and secured with Velcro straps or cords.
- Easy to move and adjust whenever needed.
Make sure that your weights match the size of your tent, as underweighting can cause collapses or insufficient safety.
2. Ballasting Systems
These are one of the best and most reliable safety anchors you can invest in, as they’re specifically designed to secure canopy tent frames on surfaces where you can’t penetrate the ground. These ballasting systems are made with precision to match the tent’s structure for long-duration installations at professional events.
They are typically made of steel or concrete and attach directly to each tent leg or fit into special brackets that connect to the frame. Furthermore, because they’re engineered for every specific tent model, they distribute weight evenly and maintain the tent’s structural integrity, making them a reliable option.
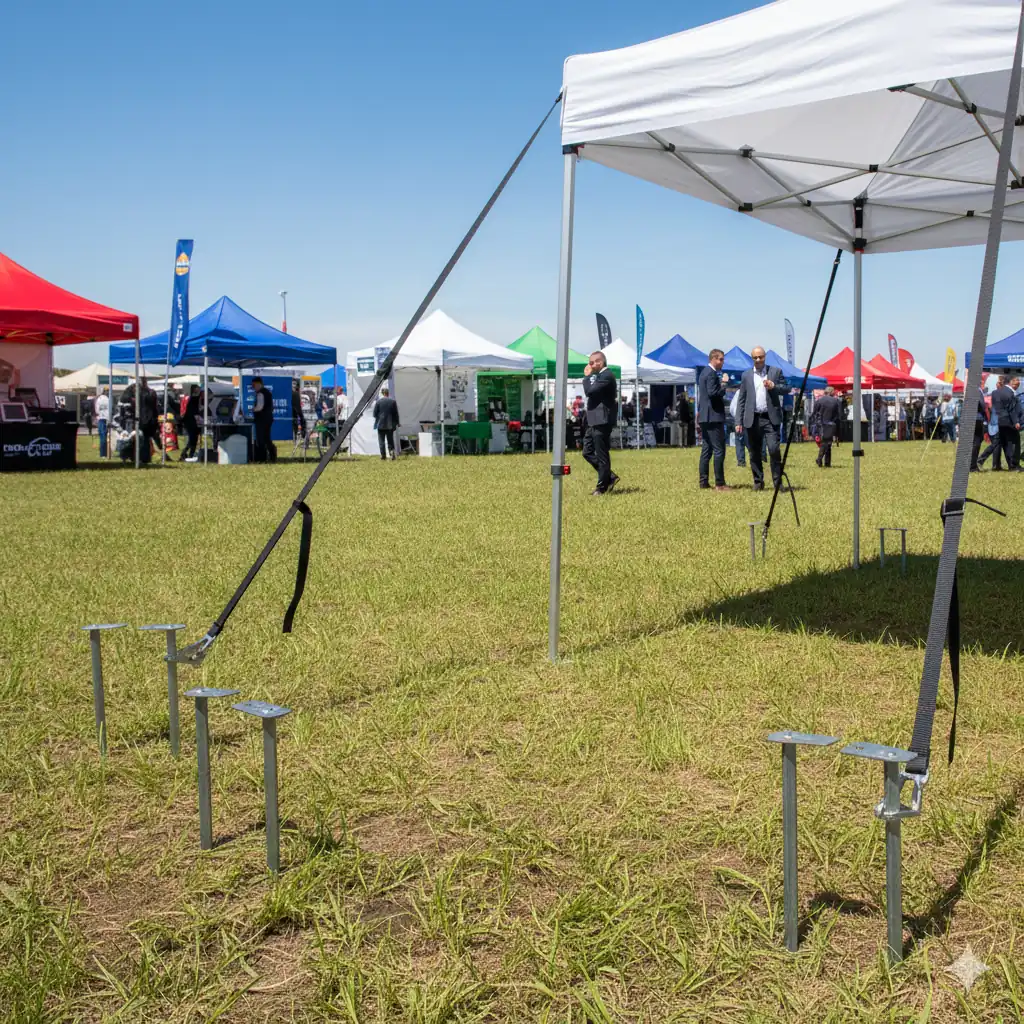
3.Non-Penetrating Anchors
They are another innovative solution for you as a business owner setting up at a trade show. Unlike traditional tent stakes, which go into the ground, these anchors clamp securely onto the tent legs. Once tightened, they can hold the leg firmly in place and can be paired with additional weights if needed.
Pro Tip: Always check local regulations—some sites mandatorily require non-penetrating anchors for safety and to protect the grounds.
If you’re unsure which anchoring method works best for your event space, contact us for a custom quote. We can help you choose the correct stabilizing solution for your tent’s size and surface.

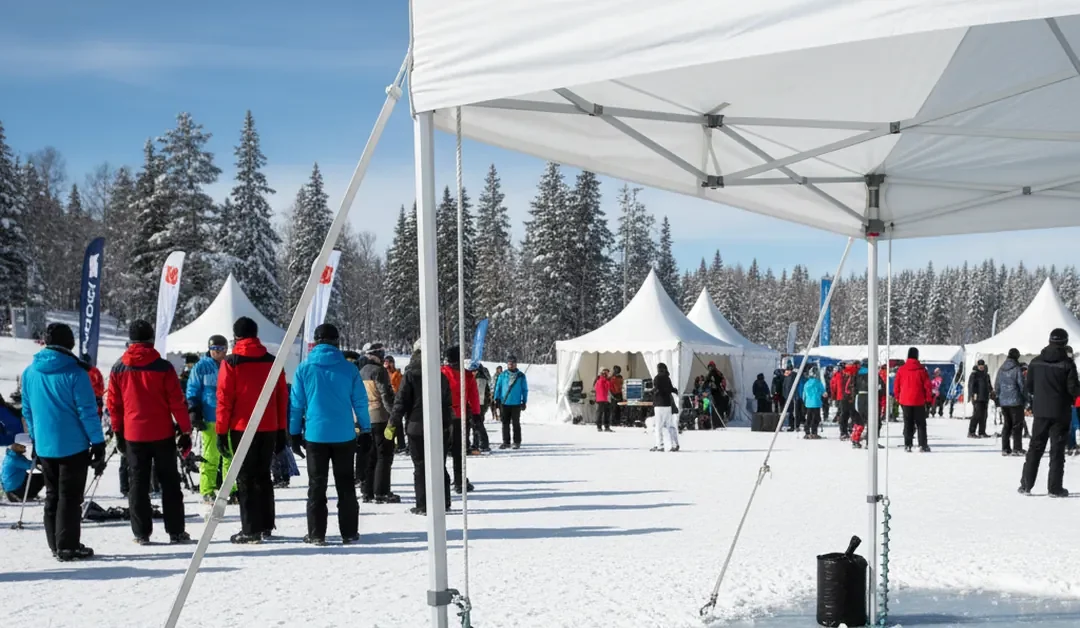
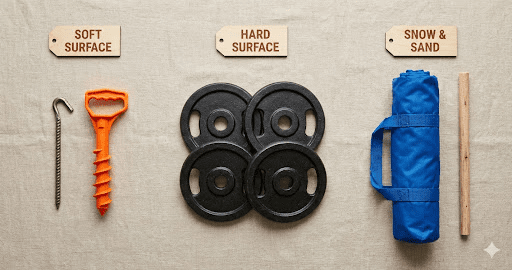
Anchoring a Tent on Soft Surfaces
(Grass, dirt, and sand setups)
Soft ground can be either perfectly packed soil or loose sand, so identify the soil density before setting up your tent. Besides, soft surfaces may be easier to work with, but they require the right equipment. You must use proper tent stakes, anchoring tools, and a proper driving technique to ensure the tent is set up correctly for your visitors’ safety.
1. Anchoring in Grass or Firm Soil
Many event planners and business owners think that grass automatically guarantees stability. However, wet soil can compromise grip and risk your tent collapsing. That’s why you should always test the ground first before committing. Use heavy-duty stakes made of steel or reinforced aluminum, as they won’t bend easily and provide enough holding power.
For larger tents:
- Use multiple stakes for each leg
- Cross-tie with ropes for additional stability
- Choose stakes that are long enough to penetrate deep layers
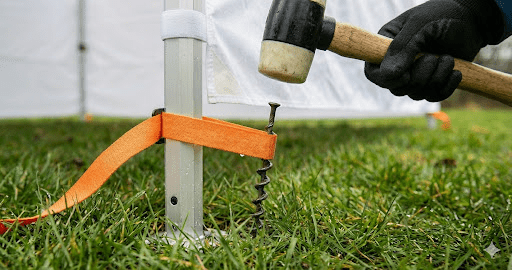
2. Anchoring in Dirt or Loose Soil
When you’re setting up on dirt, loose soil, or sandy surfaces, regular tent stakes can’t provide enough grip. That’s why in these conditions, you must use spiral ground anchors.
They’re ideal for:
- Outdoor concerts
- Pop-up markets
- Long-day expos
These anchors are shaped like long screws that twist deep into the ground, giving them far more holding power than straight stakes. Even if the top layer is soft or crumbly, these anchors can penetrate deep into the firmer layers below, keeping your tent sturdy and upright. Besides, these spiral anchors resist vertical pull-out much better than straight stakes, making them perfect for windy conditions and long-term outdoor setups where stability is a must.
3 Anchoring in Sand
Sand is tricky to set up your vendor tent on because it shifts under pressure. Standard stakes won’t hold. Instead, you must use
- Deadman anchors (buried bags filled with sand)
- Long corkscrew anchors for deeper penetration
- Wider, flat-edged stakes designed specifically for sand
Setting Up on Rocky Terrain Without Losing Stability
Rocky terrain can be intimidating even for experienced planners. The challenges are real—uneven surfaces, unstable pressure points, and very limited stake or anchor penetration options. However, with the right strategy and anchor tools, you can still secure your tent or canopy safely and confidently.
1. Use Adjustable Anchoring Systems
When a surface is full of rocks, ridges, and unpredictable contours, standard stakes don’t sit properly. That’s why adjustable anchoring systems are designed to solve this problem.
How they help:
- They adapt to irregular surfaces and align with natural gaps between rocks.
- Their flexible brackets or adjustable legs latch onto stable areas without requiring deep penetration.
- Many systems include tension-adjustment knobs to fine-tune the grip, keeping your canopy tent frame balanced on uneven terrain.
This is one of the safest ways to anchor a tent in environments where the ground refuses to cooperate.
2. Weighted Anchors for Uneven Surfaces
On rocky terrain, stakes may not penetrate deeply; thus, combining weighted anchors with strategic placement is essential to secure your tent.
Try:
- Rubber-coated weights
- Sand-filled barrels
- Transportable steel plates
3. Hybrid Anchoring
On partially rocky terrain, you may find small soil gaps in between the rocks. You can insert small tent stakes wherever possible while using weights for the remaining corners. This hybrid anchoring can provide enhanced stability and resist uplift more effectively than relying on a single method.
4. Tension Adjustment
This method is most commonly used at mountain events, trail races, or festival locations where the terrain is unpredictable. Rocky terrain creates an unstable base, which makes your tent prone to shifting, tilting, or sliding if the tension isn’t managed properly. To counter this, you must use higher rope tension.
Anchoring a Tent on Snow or Ice Safely
Snow and ice behave differently from other surfaces. They are slippery, unstable, and prone to melting or shifting, making anchoring more difficult. Here’s how to secure your tent on frozen surfaces.
1. Ice Anchors
If you’re setting up on solid ice, traditional stakes and weights won’t work. You need more reliable options like screw-in ice anchors that are similar to mountaineering tools.
How They Work:
- These anchors twist directly into the ice using a sharp, threaded design.
- The deeper the screw goes, the stronger the hold—because it grips the dense, frozen layers beneath the surface.
- Once secured, they provide a stable anchor point for guy lines and straps, even in windy or shifting conditions.
Ice anchors are lightweight, reusable, and engineered specifically for cold-weather setups.
2. Deadman Snow Anchors
These anchors can work really well and provide exceptional stability on snow rather than solid ice. These anchors rely on the snow’s ability to compact and refreeze around buried objects to help you secure your tent.
How to Use Them:
- Fill fabric anchor bags with snow or use flat stakes designed for snow.
- Bury them horizontally in compacted snow at least about 12–18 inches deep.
- Tamp the snow firmly around these buried anchors.
- As the snow settles—or refreezes—it locks the anchor in place.
This can create an extremely strong holding point, especially in colder temperatures where snow hardens into a dense, supportive layer.
3. Weighted Anchors (Modified for Cold)
In freezing environments, using standard weights can cause the ice beneath them to melt slightly, reducing stability. That’s why it’s recommended to use insulated weighted anchors. They come with rubber or insulated bases that prevent heat transfer and stop the ice from melting or re-freezing unevenly. Besides, these weights provide the downward force needed for stability without compromising the integrity of the ice.
4. Tension and Stability Checks
Frozen surfaces can change rapidly—softening during the day, refreezing at night, or shifting due to temperature fluctuations. That means you, as an event host, must constantly monitor your vendor tent more frequently than on normal terrain to ensure it’s safely upright.
Best Practices:
- Inspect tension every few hours.
- Tighten guy lines if the snow softens or if there are any visible cracks or shifts in the ice.
- Add extra anchors or weights if temperatures rise unexpectedly.
- Check for frost buildup on straps or anchors that may affect grip.
Tools You Need for a Sturdy Tent Setup
To give your prospective customers at trade shows, exhibitions, and business events a seamless, professional, and memorable experience, your tent setup must be stable, safe, and well-anchored. A sturdy tent won’t only enhance your brand image but also protect your team, visitors, and equipment from unexpected weather or surface-related challenges.
A professional setup requires professional-grade anchor tools—not the flimsy pegs that came in the box. Here are the right non-negotiable tools that anyone serious about safety and minimizing setup time must invest in:
- High-Quality Tent Stakes: When it comes to stability, your stakes matter just as much as your tent frame. You must invest in stakes that provide deep, uncompromising ground penetration.
- Ratchet Straps: Never use simple ropes. Heavy-duty, high-tension ratchet straps (rated for 500+ lbs working load) are essential for securing a sturdy tent to anchors.
- Sledgehammer: A 5- to 8-pound sledgehammer is necessary for driving rebar or heavy tent stakes deep into firm ground.
- Ground Barricades/Plates: These are great for very large structures or temporary stages. Spreading the load across the ground with plates or using professional ground-barricade systems is necessary to maintain the integrity of the canopy tent frames.
DIY Tent Anchoring in a Pinch
Sometimes you’re short on time, or something unexpected happens—like sudden wind, unavailable stakes, or restricted anchoring conditions.
For those urgent moments, here are simple DIY approaches that you can use:
- Use Water Containers
If you have access to large water jugs or tanks, they can become your temporary anchors. You can tie them to secure your emergency pop-up tent frames for added balance.
- Repurpose Heavy Equipment Cases
Tech cases, speaker boxes, or gear crates filled with tools often weigh enough to provide temporary stabilization to your tent.
- Bury Improvised Anchors
For soft surfaces, buried bags filled with sand or rocks can be used as temporary deadman anchors.
- Use Natural Structures
Secure your ropes around trees, poles, or nearby stable objects—but only when it’s safe and permitted by the venue.
These DIY solutions can assist in the moment, but remember—they can’t replace professional anchoring systems.
Disclaimer
While DIY options can help in temporary situations, professional companies offer engineered, tested anchoring solutions that meet the safety regulations. Always rely on certified systems for commercial events to keep your team members and visitors safe.
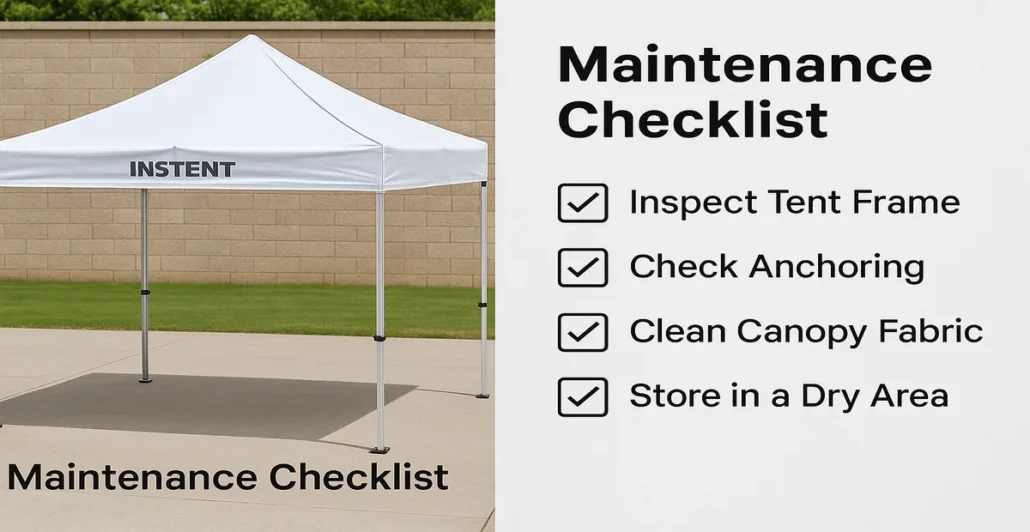
Maintenance Tips for Long-Term Safety
Even the strongest anchoring system requires regular upkeep. Regular maintenance will ensure your tent remains safe for long-term use.
1. Inspect and Replace Worn-Out Parts Regularly
Replace damaged parts immediately. Delaying repairs can compromise the safety of your tent and guests.
Check:
- Torn straps
- Rusted tent stakes
- Bent anchor points
- Loose screws in canopy tent frames
- Frayed ropes
- Cracked ballasts
2. Clean and Store Your Tent Properly to Prevent Damage
Proper maintenance extends the life of your gear—and saves future costs.
After every event:
- Clean dirt, sand, or snow from your equipment
- Dry everything thoroughly before storing those items away
- Separate metal tools from any moisture to prevent corrosion
- Fold and store your tent fabric safely to avoid mold
Conclusion
Securing your tent well is not just an operational step; it’s an essential safety responsibility toward both your team members and visitors. Now that you understand the importance of inspecting surfaces before setting up your tent and how to secure it on different surfaces, you can make informed decisions to keep your event safe.
Whether it’s a corporate exhibition or a community festival, the foundation of a successful tent setup begins with reliable anchoring. For that, choosing the right tent stakes, anchor tools, and sturdy canopy tents is important.
If you need expert guidance or recommended anchoring equipment, reach out to us for a custom quote today.
FAQS
Question 1. How do I keep a canopy tent stable during wind?
You can use proper weights, ropes, and tension lines, along with multiple anchoring points, to keep your tent stable. Use wind-rated ballasts when needed for extra safety.
Question 2. What anchor tools work best for rocky surfaces?
Weighted anchors, hybrid anchoring systems, and adjustable clamping tools work the best for rocky surfaces. Stakes may not penetrate, so combining different methods often works best.
Question 3. How often should I inspect my tent and anchoring equipment?
You must inspect your tent and anchoring equipment before every event and after each use. Replace worn, bent, or rusted components immediately.


